
介绍
- 创建项目时IDEA中自带的骨架不满足我们的需求,这时我们可以修改或自定义maven骨架,来满足我们的需求
- 下面是本作者的配置,可参考(也就是把自己常用的添加到骨架中,这样以后就不用每次重新修改)
建立web项目
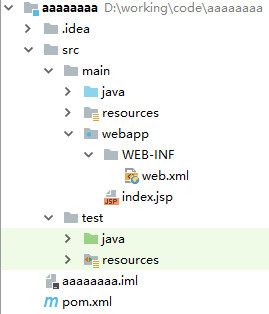
- 首先创建一个maven web项目,此项目在创建时,可以先用默认的webapp骨架。 并更改目录结构如下:
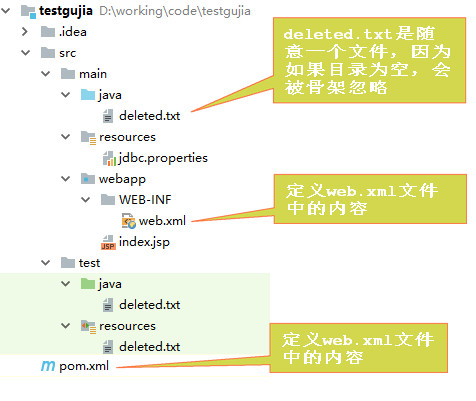
修改web.xml的版本号
  <?xml version="1.0" encoding="UTF-8"?>
  <web-app xmlns="http://xmlns.jcp.org/xml/ns/javaee" xmlns:xsi="http://www.w3.org/2001/XMLSchema-instance" xsi:schemaLocation="http://xmlns.jcp.org/xml/ns/javaee http://xmlns.jcp.org/xml/ns/javaee/web-app_3_1.xsd" version="3.1">
  </web-app>
pom.xml的修改
<!-- pom.xml改动如下   -->
<?xml version="1.0" encoding="UTF-8"?>
<project xmlns="http://maven.apache.org/POM/4.0.0" xmlns:xsi="http://www.w3.org/2001/XMLSchema-instance" xsi:schemaLocation="http://maven.apache.org/POM/4.0.0 http://maven.apache.org/xsd/maven-4.0.0.xsd">
 <modelVersion>4.0.0</modelVersion>

 <groupId>com.xxx.test</groupId>
 <artifactId>testgujia</artifactId>
 <version>1.0</version>
 <packaging>war</packaging>

 <properties>
   <project.build.sourceEncoding>UTF-8</project.build.sourceEncoding>
   <maven.compiler.source>1.8</maven.compiler.source>
   <maven.compiler.target>1.8</maven.compiler.target>
 </properties>
 <dependencies>
   <dependency>
     <groupId>junit</groupId>
     <artifactId>junit</artifactId>
     <version>4.12</version>
     <scope>test</scope>
   </dependency>
   <dependency>
     <!-- jstl 支持 -->
     <groupId>javax.servlet</groupId>
     <artifactId>jstl</artifactId>
     <version>1.2</version>
   </dependency>
   <dependency>
     <!-- servlet编译环境 -->
     <groupId>javax.servlet</groupId>
     <artifactId>javax.servlet-api</artifactId>
     <version>3.1.0</version>
     <scope>provided</scope>
   </dependency>
   <dependency>
     <!-- jsp编译环境 -->
     <groupId>javax.servlet</groupId>
     <artifactId>jsp-api</artifactId>
     <version>2.1</version>
     <scope>provided</scope>
   </dependency>
   <!-- 分页 -->
   <dependency>
     <groupId>com.github.pagehelper</groupId>
     <artifactId>pagehelper</artifactId>
     <version>RELEASE</version>
   </dependency>
   <!-- mybatis -->
   <dependency>
     <groupId>org.mybatis</groupId>
     <artifactId>mybatis</artifactId>
     <version>3.4.5</version>
   </dependency>
   <!-- mysql驱动 依赖 -->
   <dependency>
     <groupId>mysql</groupId>
     <artifactId>mysql-connector-java</artifactId>
     <version>5.1.41</version>
     <scope>runtime</scope>
   </dependency>
 </dependencies>

 <build>
       <resources>
           <resource>
               <directory>src/main/java</directory>
               <includes>
                   <include>**/*.xml</include>
               </includes>
               <filtering>false</filtering>
           </resource>
           <resource>
               <directory>src/main/resources</directory>
               <includes>
                   <include>**/*.xml</include>
                   <include>**/*.properties</include>
               </includes>
               <!-- 是否替换资源中的属性 -->
               <filtering>false</filtering>
           </resource>
       </resources>
   </build>
</project>
生成骨架
- 在项目目录下执行命令:
mvn archetype:create-from-project- 会产生 “
target”目录。务必删除其中一些无用目录,其中是当前项目的状态,会影响基于此骨架创建的项目。
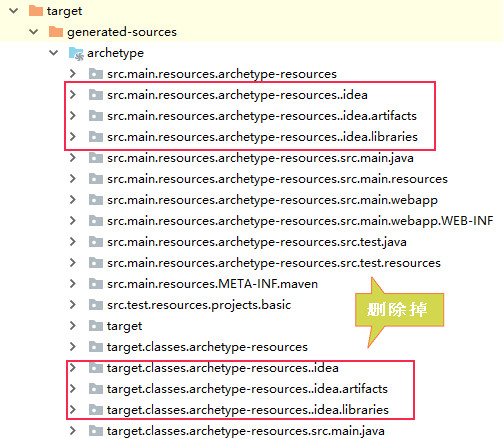
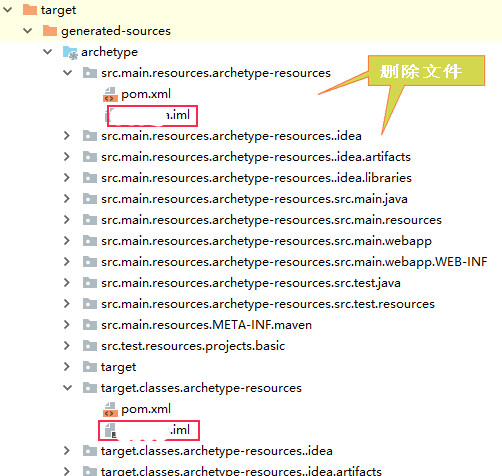
- 删除xxx.iml文件
安装骨架
- 注意: 在target–>generated-sources–>archetype目录下执行:
maven install- 即可将骨架安装到本地maven仓库
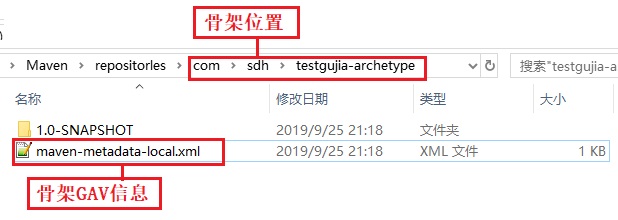
- 骨架位置,groupid和artifactid
使用骨架
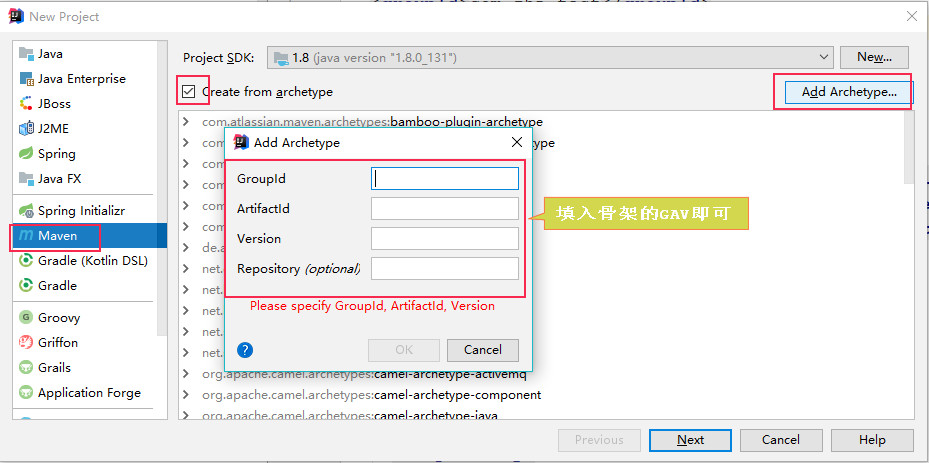
- 添加自己的骨架,基于自己的骨架创建项目
- 项目结构
自定义骨架移除
- 如果自定义骨架出现问题,或不再需要,即可如下:
- C:\Users\xxx.IntelliJIdeaXXXX.X\system\Maven\Indices\UserArchetypes.xml
- 其中记录了idea中会显示在骨架列表中的 自定义骨架内容
- 从中删除自定义骨架配置,在IDEA中就不再出现自定义骨架。
- 在删除安装到仓库中的自定义骨架即可
修改骨架
- 其实也可修改idea生成的默认骨架
- 默认骨架位置在你的本地仓库中
- 比如我的本地仓库中:

- 在这个两个文件中找到你需要修改的骨架接,打开文件中的jar
- 注意:
请不要解压,直接用解压工具打开,修改即可- 在骨架中添加文件夹时,请在jar包下的
META-INF/maven/archetype-metadata.xml文件中写上你所添加文件的路径
- 比如:
  <fileSet>
      <directory>src/main/java</directory>
  </fileSet>